
How to set up Custom Behavior Events and see where your visitors are clicking (no coding required)
Written by: Tobias
Published: 17 November, 2022
Traditionally, if you wanted to see which links in your top-navigation visitors are clicking on, you needed to add UTM URL parameters and track these in Google Analytics. Any menu-level insights were just not available in HubSpot... until now!
Side note: Custom Behavioral Events are currently only available for HubSpot Marketing Enterprise subscriptions.
In this post, we will show how you can easily set up HubSpot’s Chrome Browser Extension to help you track all click events on your website and therefore get deeper insights into how your navigation menus are being used.
The best part about it? You don’t need any coding skills.
Before we start explaining of how to set this up, let’s define what a Custom Behavioral Event is:
Custom Behavioral Events
Custom Behavioral Events enable you to understand the visitor of your site in a deep way and help you to make their buyer’s journey even more personalized. You can use such events as a trigger for the next automated touchpoint, which will help your team save a lot of time to focus on the top quality leads that are ready to talk with you.
Let’s get started step-by-step of how to set it up on your own site:
1. Install the HubSpot Chrome Extension to your browser
- In your HubSpot account, click the settings settings icon in the main navigation bar.
- In the left sidebar menu, navigate to Tracking & analytics > Tracking Code.
- Click Install event chrome extension.
- Click Download.
- You'll be redirected to the HubSpot Analytics extension in Google Chrome web store. In the upper right, click Add to Chrome.
In the dialog box, click Add extension. Once the extension has been installed, it will appear as an orange sprocket icon in your Chrome browser toolbar.

2. Create a behavioral event with the Event Chrome Extension
- Navigate to any webpage, where you HubSpot Tracking Code is installed
- In your Chrome Browser, you are now able to click on the sprocket icon in your toolbar
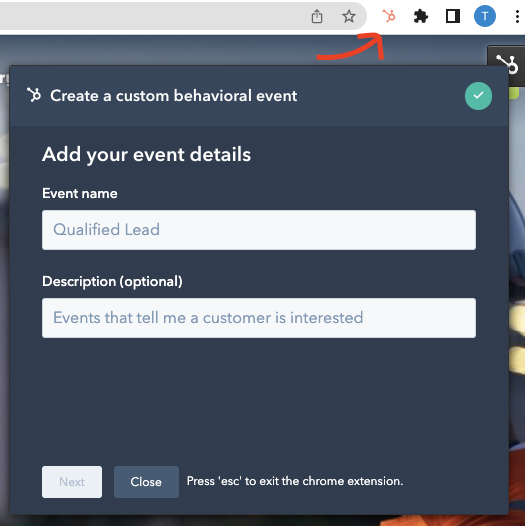
- Enter an event name and a description for your tracking event (e.g. Navigation Menu “About Us” clicked)
- Click Next.
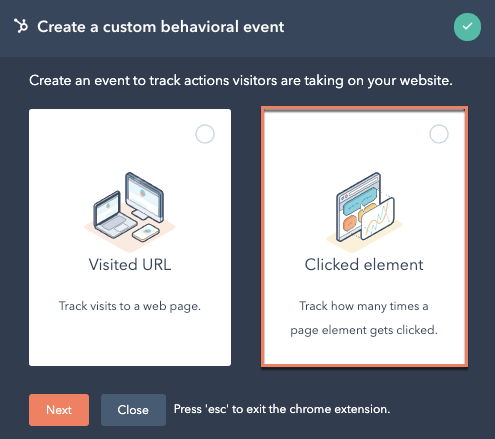
- Now you have the choice of either tracking a “Visited URL” or a “Clicked Element” on your site. Choose one and move to the next step.
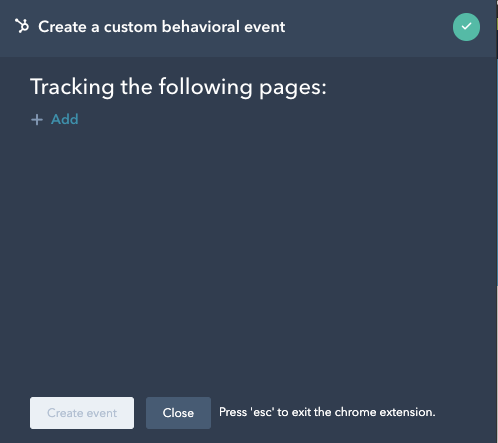
- Now you will see a screen in your browser extension, where you can click “Add” to create a new clicked customer behavior event.
- You are able to choose any part of your site with your cursor and the extension automatically creates a CSS-code based relation to your clicked item. All you need to do now, is to insert a name for your event and you are ready to track.
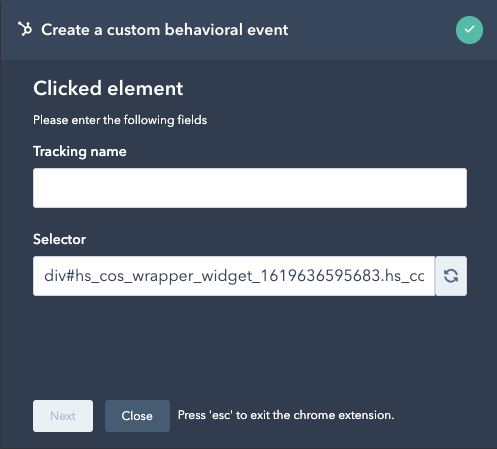
- The extension now did the coding part for you and created an event once you click “next”.
- Your events are now available under Reports > Analytics Tools > Custom Behavioral Events.
How do you analyze which clicks are being tracked?
Now that you have set up everything, you can lean back and let the clicks come in for your new events. Head over to your dashboard by clicking on Reports > Analytics Tools > Custom Behavioral Events in your HubSpot Account.
You will see that there are two tabs on your screen, named “Manage” and “Analyze”. The Manage-Tab will show you all the events that you have created within your website. Click on the event that you created, e.g. “About us”.
You will see a detailed breakdown of how many clicks have been made on your navigation item in the desired time frame. If the contact that clicked your element is already part of your HubSpot CRM Contacts, you will be able to see the exact contact who clicked. If not, it will be marked as “unknown user”.
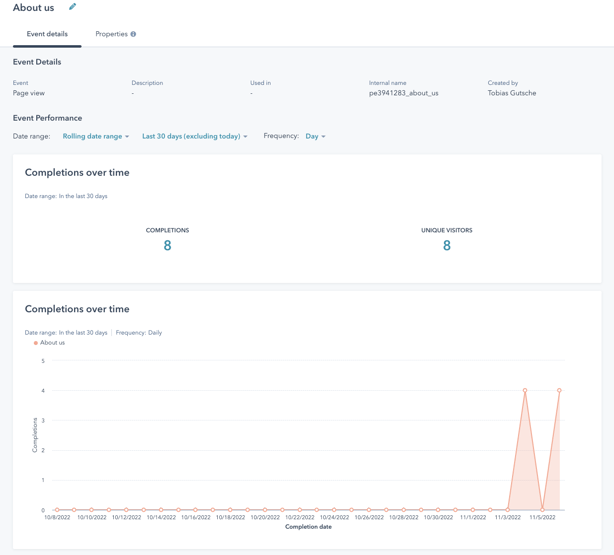
- You can select “Manage Columns” in the top right corner to customize your dashboard and reveal the data you want to see related to your clicked element.

The second tab of your Custom Behavioral Events is “Analyze”. Head over there to analyze all clicked element events within one dashboard overview.
You can now click on all events where clicks have been registered and see when they happened and who clicked the element (only if it’s already a contact in your CRM).
There is an important detail. Not every person who completes an event is necessarily a contact in your CRM. If an anonymous visitor later converts to a contact, HubSpot will retroactively add event data to their contact timeline.
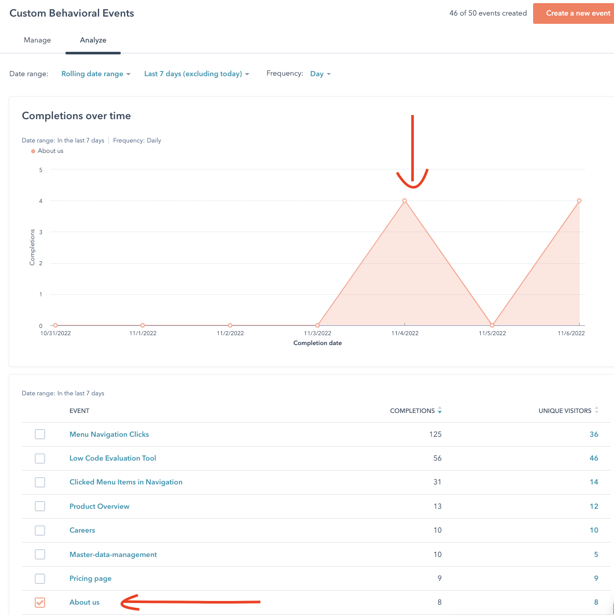
However, HubSpot cannot retroactively assign event data for events that happened before you added the tracking code. You can only see event data from after the event code was set up.
3. What you can do with the new data
The power of the insights you gained are only fully realized when you put them to work.
You can implement the gained data into your processes, automations, lead scoring and much more.
HubSpot’s automation features help you maximize your efforts. By using HubSpot Workflows, you can create responsive, hyper-targeted engagement campaigns that correspond directly and timely to specified custom events that you just created.
Such laser-targeting might look like email outreach, targeted messaging on landing pages, targeted ads, internal messages to the sales team, live chat interactions, and more.
Automated workflows combined with human interaction create a powerful combination of responsiveness for the individual customer journeys which will now be much more relevant due to the personalized content.
You can even go one step further and create custom reports on your behavioral events created and include them in revenue attribution reporting. That will enable you to transform your findings in actual numbers that convert into dollars.
4. Start Now!
Data driven decision making is what you should aim for rather than making decisions on guessing or feelings. Custom Behavioral Events are essential to attracting, engaging, and delighting the right people at the right place and time, as they interact with your website and content. This will help your website effectively contribute to your organizational growth goals.
Are you missing out on using Custom Behavioral Events?
Reach out to us if you need more help with setting up a data driven analytics strategy!
Contact us

Written by: Tobias
Solutions
Results
Resources
About
Contact
© CRONYX Digital SEZC




.png)
.png)
.png)
.png)